The following links offer a few .AVI's of the arcade machine in action. The movies are of significant size, and I only have a cable modem, so my upload speed sucks. If you choose to download one, be aware it will take quite a while. The videos are of reasonably high quality.
If you cannot play the videos, try downloading a program such as VLC (VideoLAN - it's a great, and FREE! video player). Find it here.
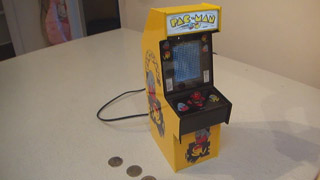
Wide shot of entire cabinet, powerup sequence, inserting a coin, and a bit of gameplay (21mb .AVI)
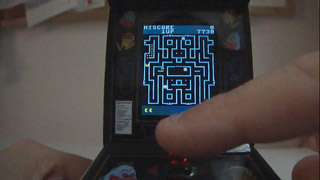
Closeup on screen, powerup sequence, inserting a coin, and some gameplay (40mb .AVI)
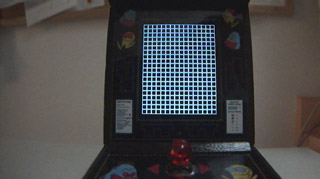
Closeup on screen, completing one level, advancing to next level (5mb .AVI)
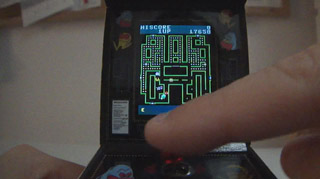
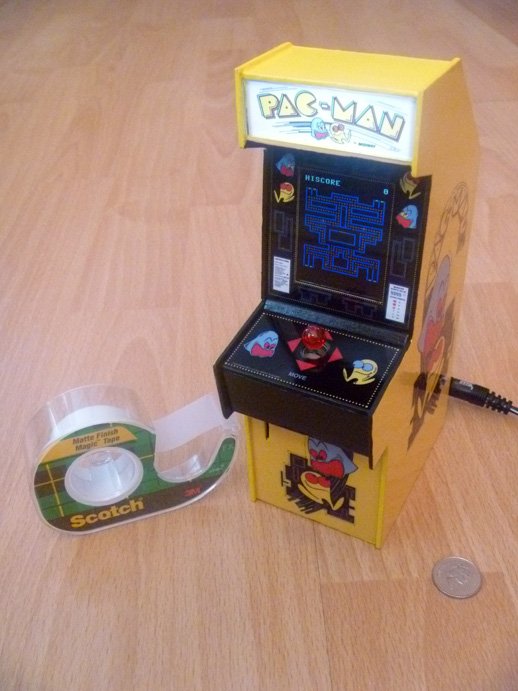
This project involved a fair amount of wood-working experience as well as a fair amount of microcontroller design and programming experience. I've always wanted to make my own videogame machine of some sort, and I can finally say that I've done it! I paired together, two dsPIC microcontrollers. One managed audio output and joystick input. The other managed game logic and video output. Those, together with a tiny analog joystick and a 128x160 color LCD screen, produced the final product. The game I chose to write, was PacMan. This, in part, because there was another website that I had found (here), which described the game-logic used by the various ghosts in the game. This allowed me to make a game that really felt like the original.
I did stray from the original game design in a few specific ways, however. The game's resolution is about 1/2 that of the real arcade machine. PacMan is 8x8 pixels instead of 16x16, and the maze parts are 4x4's instead of 8x8's. The mazes are randomly generated, because I like random generation :-) (They are the same sequence of levels every game though, so the levels are predictable in that regard). The title screen is not true to the original. The high scores are not written to EEPROM, since my dsPIC that I chose doesn't have any EEPROM :-( There are no animated cut-scenes. The gameplay is a bit of a cross between PacMan and MsPacMan. I wanted the bouncy fruits and multi-color mazes, but I didn't have the pixels for the little bow to make PacMan look like MsPacMan.
The woodworking part of the project involved using 1/16" plywood (often used for model airplanes) to create the basic shape of the arcade machine cabinet. Then, 1/8" stringers were used as guides for the (removable) PCB's, the removable front control panel, the brace for the LCD panel, and the back access hatch. I tried to design the cabinet to work just like a real cabinet, with a working (backlit) Marquee, a removable control panel, a removable rear access hatch, and a removable front glass/LCD screen. Instead of having a key-latch holding the back panel on, I used a simple screw that rotates a locking mechanism inside the cabinet.
The marque and bezel artwork are inkjet printed images on glossy photo paper. Both are located behind glass, for a more authentic look and feel. The glass was cut from a dollar-store photo frame that had 1/16" glass in it. The glass in these cheap frames, is not treated (it's pure), so it cuts very easily. "Proper" glass, like that found on your house windows, contains extra ingredients that strengthen it, and the glass cutting tool will not do anything should you attempt the same trick on that kind of glass. It turns out that cutting (dollar store) glass is really, really easy! You just need the glass cutting tool, and about 1/2 hour of practice with some throw-away pieces, then you can begin to cut glass with a higher accuracy than you can cut wood! Finally, before installing the glass, use some sandpaper on the (very sharp) edges (while under water!) to soften them to the point that they are no-longer dangerous. My final result felt safer than the glass that came out of the original photo frame! I have not yet found any sandpaper that can stand-up to the glass for very long. You'll likely use a fair amount of sandpaper while doing this.
Once the cabinet was entirely built, I masked off certain areas to avoid paint, such as the inside of the marquee area. Then I sealed the surface of all of the wood, using mod-podge. Once that dried, I sanded it with 400, and then began the task of painting the cabinet. It took about 6 coats of "bright yellow" paint. Then, the black areas recieved a single coat of flat black paint. I painted the entire cabinet yellow, including where the decals would be, since the color would likely bleed through the decal a bit.
The next task, was to add the side-art and control-panel art onto the cabinet. To create that, I went to my local computer paper store, and found some (very thin) transparency sheets on sale. I printed my side-art onto the back of the transparency (where the instructions told me to - it was the rough side). I had to reverse the image in a paint program, to ensure that the design appeared to be the correct way around when viewed through the plastic of the transparency sheet. Next, I spray-painted matte white paint over the same side that I had printed onto. It took about 8 light coats to make an even white appearance. The reason for doing that was to make the colors in the image pop out more (from the other side). Next, I cut out the 'decal', and layed it on newspaper, white side up. I then gave it a coating of '3M Super77' spray-on glue. This stuff is great! I let it dry for about 2 minutes, until it was kind-of tacky on my finger. This way, it can be repositioned (carefully) if you're not happy with the position the first time. I carefully positioned the decal on the side of the cabinet... and then removed it a few times, trying to get it just right. When I was finally happy with it, I pressed it down all over with my finger. Why a transparency sheet? Well, I didn't want the next step to cause damage to the printed image. The transparency sheet protects the image from moisture because the clear plastic is in front of the image that you are viewing.
The final step, was to spray gloss all over the cabinet. This turned out to be a bit tricky. You need to do several layers of gloss to really make it shine. And you need to use thick layers, or else the gloss appears to go all stippled and matte looking. Luckily, if this happens, the fix is easy. Just add another layer of Gloss! However, every time you apply another layer of gloss, you give all the airborne particles in the room another chance to merge permanently with your work. Another real problem is fighting the urge to poke it, to see if it's dry yet. If you do, you'll leave an ugly fingerprint shape embedded in the gloss. Back we go for yet another coat! ug.
I built and painted the entire cabinet in pieces, and did not attempt (final) assembly until all pieces were thuroughly dry (24 hours). After all the gloss, the coin slot needed to be widened again (a simple task, using a dremmel tool). Other than that, things worked very well!
