
I play a lot of DCS World, XPlane, and Microsoft Flight Simulator. All of these games support VR nowdays, and after trying it, I quickly decided that's the ONLY way to fly.
The primary reason is that it's like a giant puzzle to me. Each aircraft is a new machine to master. And they're not simple machines.
Not falling out of the sky by doing something stupid, is one thing. Yea, you can use the stick, rudder and throttles and fly from A to B yourself, with the throttles max'd all the way. Many simulated aircraft will let you do this. But how about taking care of the aircraft properly? In DCS World, the P-51's engine will overheat and suddenly seize in mid flight, the massive propeller in front of you stopping instantly with a huge bang that will certainly get your attention. Then you're left with the task of gliding your crippled plane-of-shame to a safe-ish landing somewhere in a nearby field -- if you're lucky enough to be over land at the time.
Or how about all the automation? Can you use the autopilot to get from A to B without having to hand-fly it the whole way? Can you start up the aircraft from a cold and dark configuration? This requires study time on the internet after the purchase any new aircraft, and is all part of the puzzle-like experience for me. Each aircraft is different. In the airliners, there's a huge amount of information to be learned! How much of this aircraft do you really know?
Can you make a proper 3-point landing in a tail-dragger? In VR, you can really get the feel for the proper pitch when flairing to land. As the nose of the aircraft comes up and then blocks your vision down the runway, you'll have to transition to looking out the sides of the aircraft, keeping a sight picture involving the edges of the runway correct as you touch down and roll out. Do you know how much runway remains? I'm looking at you, P-51. It's just like the real thing. Far more so than a monitor setup ever could be, because it feels so much more real.
Now, can you do that at night and in the rain? Can you find the runway and land at a foggy destination? Can you wrangle the aircraft to a successful touchdown in a gusty environment? It's an exersize in fully understanding the machine and its limits.In VR, you're literally in the aircraft cockpit, free to look around inside, outside. The full visual experience.
Some of my biggest butt-puckering moments were...
When it comes to flying gliders, there are a few websites online which allow actual glider pilots to publish their flights. I use these websites to find interesting new places to fly, or flights to try to reproduce myself.
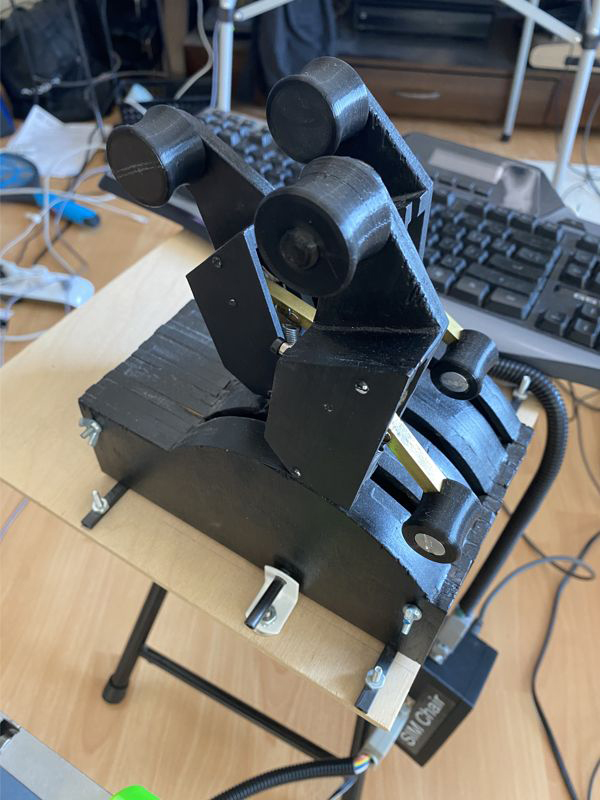
I have an old chair which I have modified for flight simulation. It has a narrow back, which helps with looking behind you. However, I'd like the back to be a bit shorter, so looking up is a bit easier too. But not too short that it's not fully supporting your back anymore. It's almost perfect.
Starting on the right side of the chair, there's a stool with a wireless mouse on it. I'm pretty good at finding the mouse on this small surface, should I need to click on something in the cockpit. But ideally, I don't want to use the mouse at all. Normally, I only really use it when starting up an aircraft, or when flying an airliner.
Built into the right side of the chair, within easy reach, is a custom panel of buttons and switches.
All these knobs, switches and buttons are customizable per-aircraft.
I specifically chose 3 main buttons differently, so that I can tell where I am by touch.
Typically, I configure the two switches at the back to act as fuel cutoff switches.
The small rocker switch is usually the canopy or door.
The larger rocker switch is the speed brake for combat jets.
The dials control various features of the autopilot, radio, or moving map (such as target altitude, vertical speed, radio frequencies, or map range).
The 3 push-buttons control random things like poping up the refueling menu, or the communication menu.

On the left side of the chair, is a helicopter collective.
This is a long bar which you can raise or lower, which causes the helicopter to rise or fall.
It also has a twist-throttle built into the grip.
I did not put any controls on the end of the collective like a real helicopter,
because it would be a big clunky box that would get in the way of me moving around,
especially if I'm not flying a helicopter at the time. If I'm flying an airplane, then
the collective is nicely tucked away simply by pushing it down to the lowest point.
But only because there's no big box on the end of that stick.
This collective design took several revisions to get right. The hardest part was finding a way
to mount a working throttle to the end of the arm. One that wouldn't slip or break easily.
When I bought my 3D printer, I was finally able to conquer this problem and am very satisfied with the rock-solid final result!
The mechanism that converts the throttle twist into cable movement, is located within that neon green object.

I purchased a bicycle grip which had nice looking anodized aluminum end-caps.
I immediately removed the end-caps and threw them away.
Next, I inserted skateboard ball-bearings, one into each end of the handle.
They fit perfectly.
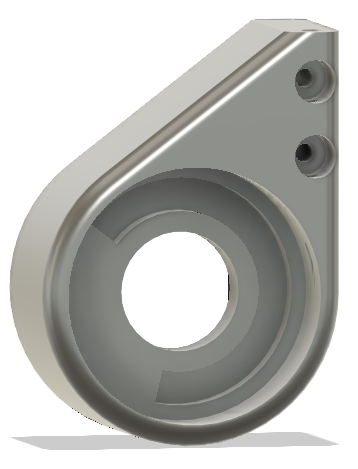
Next, I put the ring that you can see below, on one end of the handle.
The large inner cutout of the ring is the same shape that the end of that bicycle grip uses.
Now, turning the grip will obviously rotate the ring.
There is a key at the bottom of the ring, which will limit the distance that the ring can rotate (you'll see how, later).
The ring has a slot where a throttle cable is routed around.
On the left edge, that's where the cable departs the ring in an upward direction, and travels directly up and out of the (not yet shown) case.
On the other end of the throttle cable channel, is a little L bend. That just exists to grab the cable and stop it from slipping.

Once the cable is inserted into the channel, I insert this locking block, which tightly holds the cable near the L bend.

This is the case, or the neon green part you could see on the chair.
We are looking at it from the other side (vs the ring that we were looking at).
Notice the slot where the key from the ring would be allowed to travel within.
This limits the twist that can be applied.
(I printed this with PETG. You would have to really crank on it to break it).
We see it here, with the hole where the cable exits facing upward.
You can see on the right-hand wall of the circle, there's a hard-to-see small hole that allows the cable to depart from the ring
and travel straight up and out another hard-to-see hole on the top.
There are 2 small round holes that allow you to tighten down some clamps that are used in R/C Aircraft and pushrods.
These clamp the outer sheith of the throttle cable, so it cannot move while allowing the throttle cable inside to move.
That outer sheith was able to be pushed into the top hole, but not quite all the way down to the bottom hole.
As luck would have it, you can over-tighten these and they start to add friction to the cable inside too,
so you can adjust the throttle friction here.
So, to finish building it, insert the throttle grip's ring into this case,
while routing its' throttle cable up and out that hole. Then add the sheith onto the throttle cable, tucking it into the top hole as far as it will go, and tighten it down.
You now have a ready-to-go throttle.
To mount this completed assembly to the collective arm, we look at the other side of this case...
Notice that it has a square hole. The collective arm is square. Simply stick it on.
The small holes visible on this side of the case serve no purpose - I was apparently a lazy modeler and didn't fill them in.
They loosely relate to the R/C clamps.

The final thing to so, is run a threaded rod through everything, which can be locked down on both ends with nuts.
Pick a threaded rod that is the same size as the inner diameter of the ball-bearings, so there's no slop.
In the photo of the completed collective above, you'll notice a small square cutout part way back on the collective arm.
Inside that, you can see the end of the threaded rod, and it's being held in place by a wierd nut thing that I found.
The other end of the threaded rod is inside the black end-cap, and is retained by another nut. It's a very strong design.
I guess the other thing to be aware of, is that the throttle cable has to go somewhere.
There's a linear potentiometer mounted to the side of my chair, and the throttle cable goes there.
Also, a pushrod related to the collective arm itself goes to another linear potentiometer in the same area.

Also on the left side, is another round stool which has the Throttle Quadrant and Keyboard sitting on it. The Throttle Quadrant was also built before I owned my 3D Printer, and was updated a bit afterwards. It's primarily built of wood, has spring-loaded reverser handles (I found out later that reversers are not normally spring loaded, but I'm used to how they operate already and won't be changing that). The right-most throttle also contains a TO/GA button and an A/T Disengage button. As usual, everything can be remapped to do anything, and can be aircraft-specific. eg. I can map the left throttle to act as the speedbrake handle, the middle throttle to act as the flaps, and the right throttle to control both engines on a 737. Or I can map all three throttle handles to act as the 3 engines of an MD-80.
The friction of the throttles can be adjusted by tightening or loosening the two wing-nuts at either end of the throttle body.
This works because each of the 3 throttles is a separate module, and are designed with a small gap between them.
Foam is present on the inside, which the throttle arm is in contact with.
Tightening the wingnuts closes the gap and squishes the foam harder. It's a simple solution, and works good enough.
Friction rarely needs to be adjusted.
The FlightSick that I use, is a "Microsoft Sidewinder ForceFeedback 2". I actually own two of these. They are absolutely amazing. Very strong, and very smooth movement. I have written my own forcefeedback software for this joystick, so that Microsoft Flight Simulator and XPlane 11 can have force-feedback, because the games themselves don't support it. DCS World does support it already.
My software models the following forces, and can be customized per-aircraft:

And finally, the rudder pedals that I use, have been updated via 3D Printing, to offer 3 toe-buttons on each foot.
These were necessar in order to be able to fly the A-10 and use its complex computers while in VR. They act like SHIFT, ALT, CTRL (like modifiers),
allowing me to map the 8-way hat on the flight stick to different systems depending upon which button is held at the time.
It was a bit awkward, but it got the job done. I don't really use those buttons for any other aircraft.
